Blog

Interactive Installation Project

Change of mind

Change of mind and Project Realisation…

Initially I was planning on furthering design and improving on my ‘Interactive Guitar’ project from earlier. After discovering Leap Motion I was inspired to include this in some way.

Trying different placements (middle pickup position, lower pick guard etc.) for the Leap Motion I soon realised that none of them would really work in a meaningful way. One of the main ideas I wanted to explore with this new project was having an installation type design that could be interacted with by anybody of any age and skill level. This was a limitation of my earlier Interactive Guitar project, seeing as it was a more of watch a performance style display, I would encourage people to come and try it for themselves but due to it being a left handed guitar I felt this was another barrier in the way of being and interactive installation.

My plan currently is to have a microphone setup in the middle of a room with a table down in front of it that has a leap motion placed on top. The idea is to have someone be able to speak into the mic whilst they manipulate and morph the sound of it by using hand movements and gestures using the leap motion. For example left hand height will dictate the pitch your voice is played back at whilst the tilt of your right hand could be some ring modulation etc. There will be many different effects associated to produce a very interesting sound that will keep people interested and amused.

Im still getting ideas for visuals/lighting that could accompany this installation, this are a couple of videos I have been looking at this week:

Cool Light InstallationĀ 

Another cool one

Arduino Light Show

Arduino/MAX

Leap Motion…

Recently discovered Leap Motion, and got the chance to use it last week! You can check out what its all about, click here

The biggest thing that interested me the most about it is Leap Motion’s midi capabilities. Being able to individually map each finger’s bone x, y and z position to their own midi channel is just wild!

This has definitely opened up a whole new world for future projects and I’ll be looking to incorporate it somehow into my interactive guitar from previous months back.

Watching this in depth tutorial of how to use the Geco add on which allows for midi mapping and control was a big help, Geco Midi Tutorial


Arduino/MAX

Assessment Task 2

Interactive Guitar

Basically my aim for this project was to have a sensory inputs stuck on a guitar, that could be interacted with to alter audio effects on the guitars signal.

Using a piezo sensor, light dependent resistor and a joystick going into my Arduino Uno. The piezo is used to set the tap delay time for the delay unit. The LDR is controlling the pitch of the phaser. The joystick is controlling the panning of the guitar signal, quadraphonically.

IMG_1513.JPG

Using the HC-05 Bluetooth module I was able to eliminate the need for a usb cable to run my Arduino Uno. Also a 9V Battery going to a 2.1mm power plug to power the board.

IMG_1515.JPG

I made use of the Squier’s pick guard which I removed to drill holes through to run cables and mount components onto. Lots of double sided tape helped me out. Hot glue I also used just to secure jumper lead connections into the Arduino.

IMG_1511

The LCD screen is just there to display the name of the instrument and what it is, as an added touch!

MAX MSP part

For the Max portion of this project it was nothing too extravagant. Basically the guitar’s signal gets brought into Max via an ‘ezadc’ , it is then split going off to three different effect sub patchers. A delay unit, Distortion/Fuzz and a Phaser. These then run through their own individual fader then all to the a master fader which is then routed to a quadpanner sub patcher then out to a four channel dac.

There is the section for reading the Arduino’s information, which i then send off each components number values, ready to be recieved

There is a large section dedicated to the OSC communication, allowing faders and toggles wishing the OSC app to control parameters inside of Max. I used the TouchOSC Editor on my mac to create a layout that would best suit my design. This also allowed me to give labels to parameters which improved the general UI.

Video example


Arduino/MAX

New Arduino Project Inspiration

Its time to create a new Arduino project!

Here a few videos I have been watching to give me ideas and inspiration for my next Arduino/MAX project/design…

Arduino Guitar Pedal

Open Sound Control (OSC)

Arduino MIDI Controller

Touchless MIDI Controller for Guitar

A lot of Evan Kale’s videos I found very entertaining and informative but also inspiring.

I definitely want to incorporate the use of a guitar and OSC through my phone. Im thinking at the current moment to setup an LDRĀ  or even piezo/s somewhere on my guitar that would adjust effect parameters inside MAX (effecting guitar signal), which can be changed by using an OSC app on my phone. For example chose what effect the LDR is altering through the OSC app.

Still just in very early stages of brainstorming and getting more ideas. Stay tuned for more updates!


Arduino/MAX

Arduino Assessment

For this project I basically expanded off my most recent blog post which you can read here.

In this project my end goal was to have five sensory inputs hooked up to my Arduino Uno that would be used to control values inside a Max patch which includes synthesis and visual display/feedback.

My inputs included

  1. Light Dependent Resistor (LDR)
  2. Rotary potentiometer
  3. Joystick
  4. Trim Potentiometer
  5. Push button

The final product and tutorial can be seen here – Youtube Demonstration
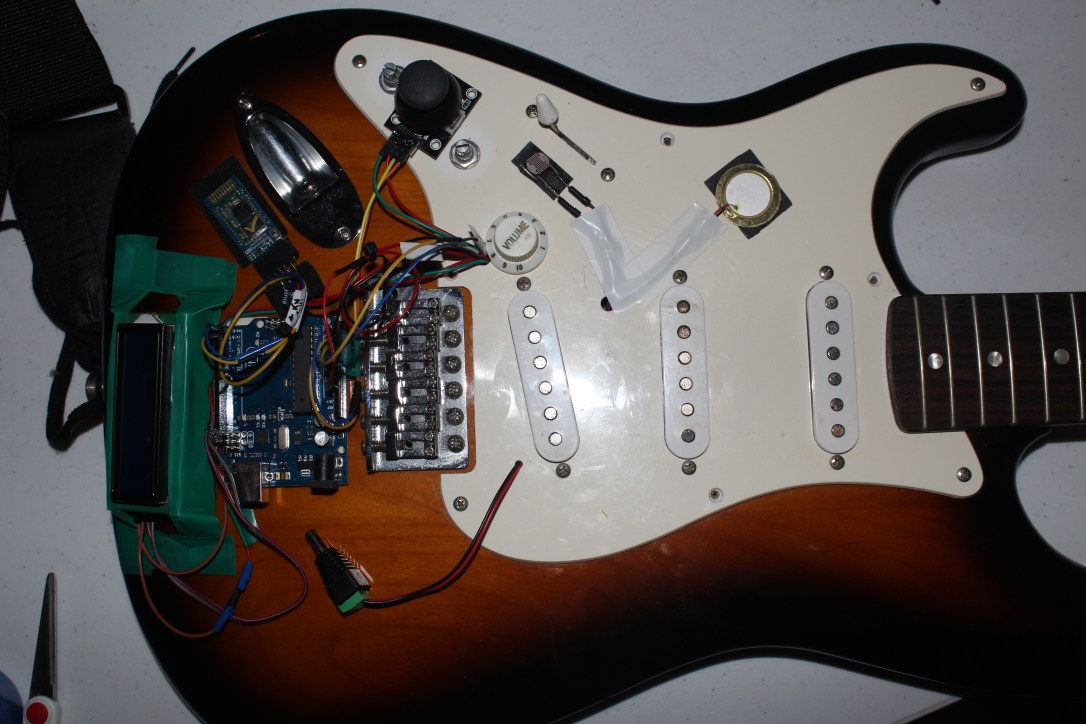
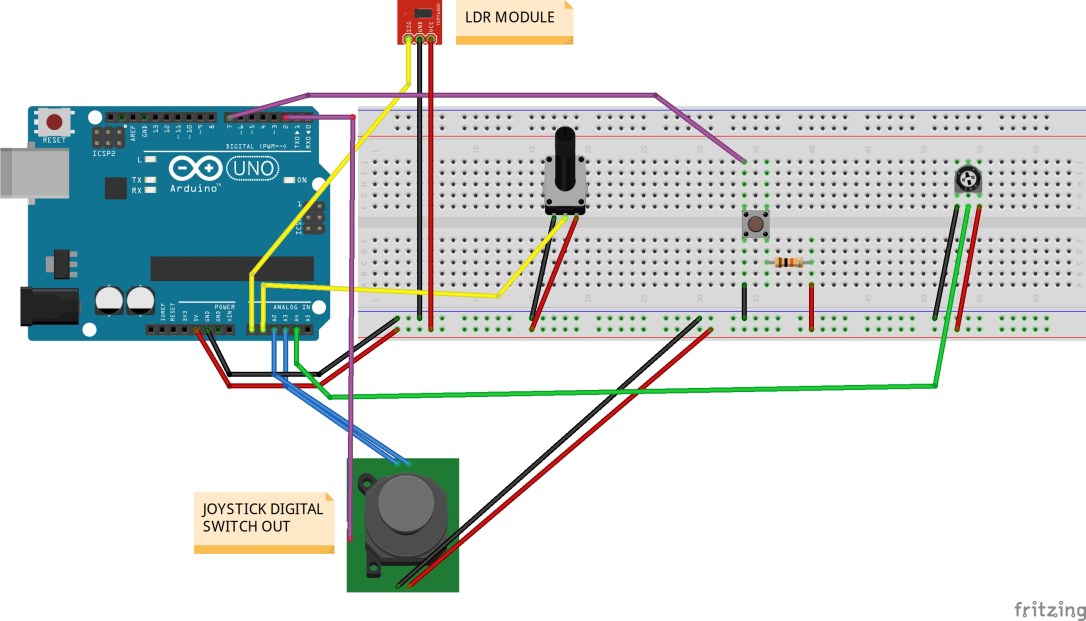
Arduino Patching

I have provided a circuit diagram created in the program Fritzing. which displays how I wired everything up.

Arduino Assessment FINAL SKETCH_bb


Arduino Sketch IDE

I based the foundation of my sketch around the ‘virtual color mixer’ example sketch within inside Arduino IDE. Re-labelled some code so they matched my components and also added four new fields to allow for my other inputs, because virtual color mixer is based off 3 analog ins to control RGB fields. That involved adding ‘const int’ lines at the start of my code then referencing to them in my void loop using ‘serial.print(());’ .

Another factor to take into account was to add the extra code needed for the digital inputs incorporated. Virtual Color Mixer’s code is only setup for 3 analog ins. Looking at examples for the use of a button, I worked out how to combine the button code into my project. Here is my modified sketch…


const int LDR = A0; // Light dependent resistor
const int Potentiometer = A1; // rotary potentiometer 
const int JoystickX = A2; // joystick x axis
const int JoystickY = A3; // joystick y axis
const int JoystickBut = 2; // joystick button
const int Potentiometer2 = A4; // potentiometer (screwdriver)
const int buttonPin = 7; // pushbutton

int buttonState = 0;

void setup() {
 Serial.begin(9600);
 pinMode(buttonPin, INPUT_PULLUP);
 pinMode(JoystickBut, INPUT_PULLUP);
 
}

void loop() {
 buttonState = digitalRead(buttonPin);
 
 Serial.print(analogRead(LDR));
 Serial.print(",");
 Serial.print(analogRead(Potentiometer));
 Serial.print(",");
 Serial.print(analogRead(JoystickX));
 Serial.print(",");
 Serial.print(analogRead(Potentiometer2));
 Serial.print(",");
 Serial.print(digitalRead(buttonPin));
 Serial.print(",");
 Serial.print(analogRead(JoystickY));
 Serial.print(",");
 Serial.print(digitalRead(JoystickBut));
 Serial.println(",");
 
 
}

Once you upload that onto your Arduino board you are ready to open up Max.

Max Patch

The same concept applied here in the sense that I brought over the Max code included in the Virtual Colour Mixer example in the IDE. All that was required in order for Max to see my inputs’ values was to add extra ‘0’ fields into my unpack object. The way the code was done in Arduino, every second output on the unpack object is a feed of analog data. For example if I were to have 3 inputs, I would then need 6 zeros entered in my unpack.

unpack snippet

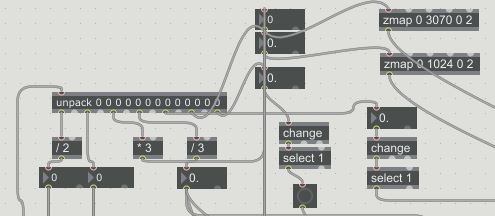
When you open up my Max patch you will see the values of my inputs entering Max are then feeding different oscillators frequencies and controlling parameters for my jit objects. For some inputs I have divided or multiplied their values to make them more or less drastic. One object I found super useful was ‘zmap’. This allowed me to specify a range for me inputs to fall between. For example most attributes for my jit matrix would only work nicely in small values (0 to 3). So I would use zmap to tell it to scale values from 0 to 1024 down to 0 to 3.

The next thing I wanted was for my buttons (push button and joystick switch) to latch down when pressed. By default the button only sends out a 1 forever how long it is held down. In order for this to be changed I took the output of my button value into a ‘change’ object then into a ‘select’ object with a value of 1. This gave me the result I was after.

Audio

All sound from this patch is the accumulation of 4 oscillators…

oscillator setup

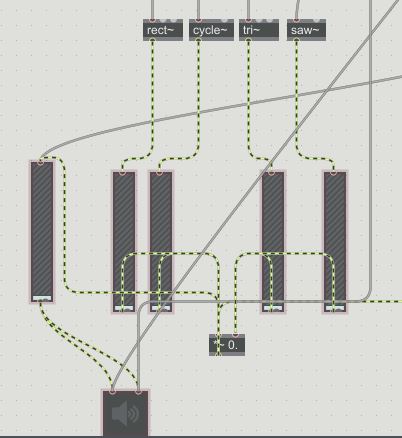
The LDR, Potentiometer and Joystick (x and y) are constantly feeding the oscillators with a frequency to produce. Each input is responsible for a separate oscillator. Then the little trim potentiometer is mapped to the master volume for the synths.

That is pretty much it in terms of the audio processing for this patch.

Visuals

I based the majority of my visual work off a youtube tutorial I watched on Jitter. Which can be seen here – Link to tutorial

jitter setup

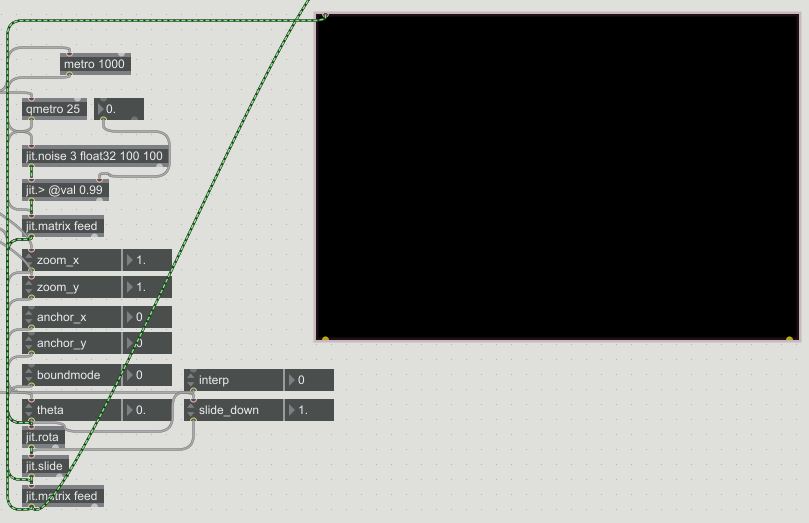
Basically all the visuals are is a jit.noise object that uses jit.feedback on itself. Plus a whole bunch of attributes to manipulate the imagery further. A handful of these attributes such as the zoom, theta, slide_down etc. are being controlled by my sensory inputs so they affect the audio and the visuals inside of Max.

The beauty of this patch is that once you have your Arduino communicating properly with Max and you are seeing your inputs values you can route them to control basically anything inside of Max. The possibilities are endless in other words.

That pretty much covers the whole design in detail, see it come to life HERE