Blog

Interactive Installation Project

Test setup findings

In my test setup I learnt quite a few things that will need to happen in order to make this installation achieve the best it can.

The three biggest things that stood out were…

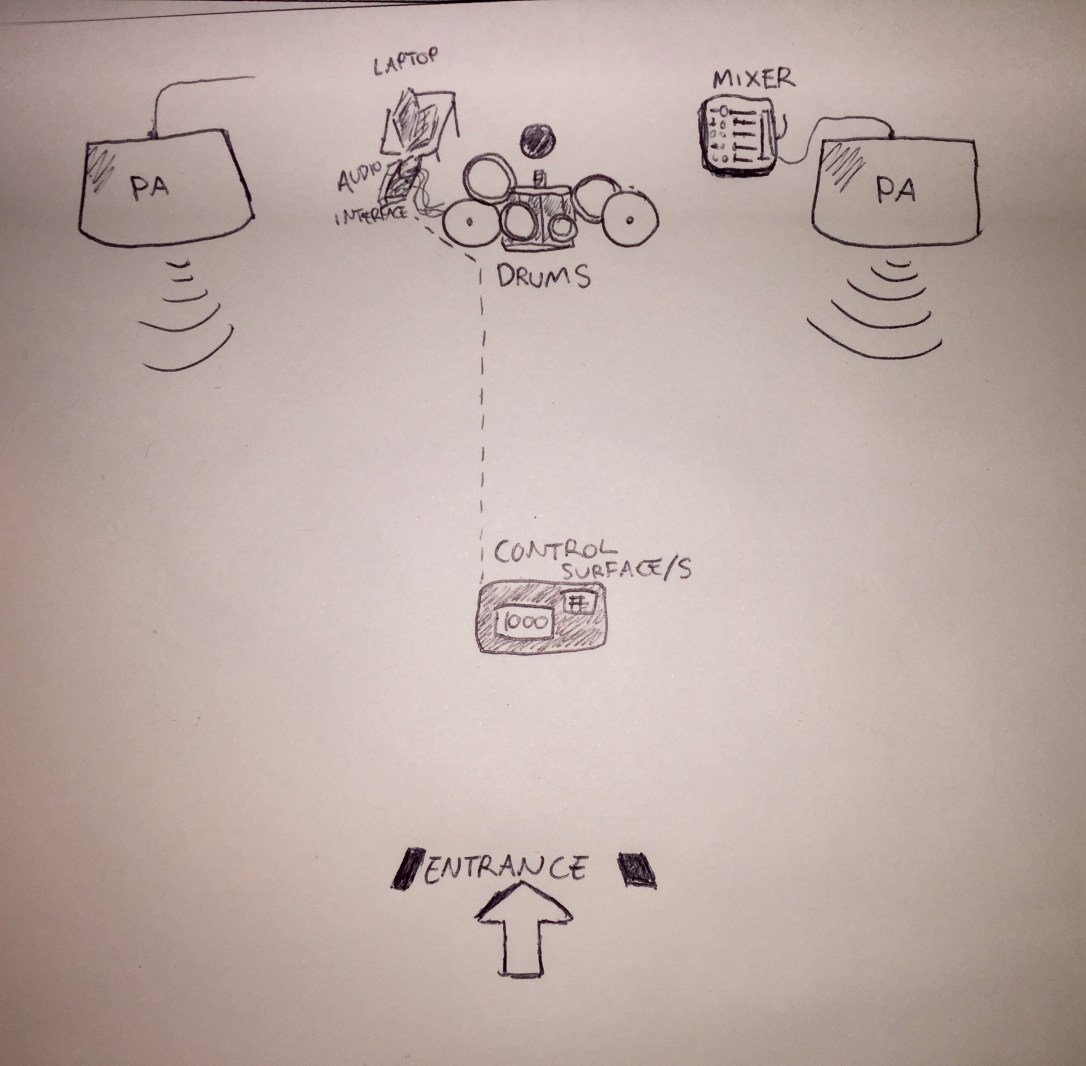
  • Fine tuning for the max patch controlling piezo sensitivity (especially for the toms).
  • Simplifying the control surface for the user to make sounds/control sound.
  • Incorporation of some source for drums being hit to make it obvious to a wide variety of people that the associated sound is coming from that hit.

These will be my working areas for this week as I continue improving and tuning up this project. Also the smaller things I need to purchase and get organised, these include some black cloth, some cables etc.

A video I watched this week to get an idea of one way to incorporate vision and playback into my display – Watch Here

Interactive Installation Project

1st Prototype Time!

Will be able to setup and have a real proper test of what my installation will be like in the next couple of days. I reckon this will be a great opportunity to figure out what works and what needs tweaking before the final installation takes place.

The current setup is as follows,

FLOOR PLAN

floor plan.jpeg

Acoustic drum kit setup. A piezo mounted on each the kick drum, floor tom, rack tom and crash cymbal.

Piezo signal running into audio interface.

Max 4 Live Audio Effect converting signal to a MIDI message.

MIDI message being received on a channel and used to control a sound/sequence.

Each drum that has a piezo mounted is triggering a chord/melody that are being sequenced together.

Having a look a Depeche Mode for some drum sound inspiration this week – Video

Interactive Installation Project

Project Update

Currently in the midst of soldering my piezo pressure sensors together and attaching a ts connector on the end to go into my audio interface. I figured I could make my setup a lot simpler by not using an Arduino at all.

So instead now I have the audio signal from my piezo’s going into a track into Ableton, where I am using a Max for Live patch that is converting audio over a set level to a midi note. This midi note is then being received on a midi track where it is responsible for a certain instrument. This saves me using an Arduino board and 3 sets of softwares running simultaneously.

I currently have a piezo that is mapped to scene changing within Ableton where each scene has a different key and scale for all the instruments.

Possibly looking into this plugin as well which looks like it might come in handy

MIDI Harmonization Plug

Interactive Installation Project

Change of mind, again…

So this week I figured I could change up my initial project plans to make something much more interesting and immersive.

My plans now are as follows:

  • A drummer plays on his kit as you walk into the room
  • Certain cymbals and drum have Piezo sensors hooked up to them
  • These piezos are sending MIDI into Ableton
  • Each drum hit is randomised in triggering an instruments to play chords and scales
  • they all play together in key but are totally random in their patterns.
  • Characteristics of these sounds can be changed dramatically
  • the user is presented with a leap motion placed on a table that is front of them as they enter the room.
  • the user uses their hands to manipulate the sound design of the drums being played live by the drummer.

Inspiration for this project after chatting with the drummer who I’m collaborating with for this project got me onto this man –  Zach Danziger

I recently discovered a program that will make my life a lot easier when it comes to tackling this project and will cut out the need to use Max.

Hairless MIDI is the name of this program that converts data over the serial port into MIDI which is then accesible to programs such as Ableton which im planning on using.

Hairless MIDI

Interactive Installation Project

Interactive Voice Performer beginnings

I have began to layout my early plan for my interactive installation project. This week has been me working out what materials I will need and the costs involved to have the project up and running in time for the performance night.

I also managed to do a quick test with everything setup just to see how it would work roughly and was quite pleased with the result. Using just basic preset effects inside Ableton mapped to different MIDI channels corresponding to different hand movements that GECOmidi sends out. Without much tweaking at all I got quite a smooth input and playback feel using the softwares.

You can view my instagram clip where I had my hand height controlling the formant amount of the Ableton vocoder, hand backwards/forwards distance controlling dry wet of a ping pong delay whilst the tilt controlled the dry/wet of a flanger.

Watch Here

Now will just be a matter of playing around with effects and different MIDI mapping combinations until I find what feels the most interactive and expressive. Figuring out a way to have the kick and snare be less ‘static’. How to have them included in the Leap Motion somehow appropriately that doesn’t feel forced.